Saturday, November 20, 2010

Cheap 6mm Trenches

A quick Project from the Yahoo 6mm Group discussion idea:

 
Nice bit of scrap card but the firmer the better and even plastic coated sided 
Then pencil out with ruler the basic side of each piece
And cut out well easier with a pair of scissors

Low relief Trenches and such

Just draw out in pencil what you wish your trench (foxhole, dugout etc) in pencil to look like
 
then seems to be better to just paint in browns or whatever colour suites the actual "dug" part  
The Ingredients to mix up for like sand and PVA glue Acrylic paint in your desired colour (not necessary But helps later on)
 
So mix up paint PVA and some warm water in 1/3 each less is better of Water but can add can't remove ant of the mix
In the mixing bowl of some old dip (well no Dip, and not, old as we ate it!!!) 
Just keep mixing it up with stirer or old brush 
To make a nice paste up not to runny not to thick but if thick can add a little water but this is more about it all soaking into the sand, and the colour will coat and blend in
 
Then apply to outside or ground area around the trench


Was to sprinkle sand on but better to dump snad and when dry or drier as in adhered, to shake of upside down Just tapping lightly with finger on bottom of base, over Newspaper or back into the stock.

 
So it will end up something like this
 
then go full hog and do sixty at once


So easy when you get the hang of things
 
And let left dry which is usually quite quick if you have the mixture right!
 
Then adding another layer by repeating the process
 
Then keep on building it up ready for trees logs grassing etc
 
"Keep your soviet Armour off the grass! Please" 
So there is a bear in there!

 
Just a Visual on how they will work in 6mm
 
Rommel has to inspect things

 
Ready for more work, but again that is another story for another day
These took no time at all, So can be built up etc and added to, they will also be castable.
So adding damage, boxes, little doors, debries etc.....

cheers Karcuss

Tuesday, November 16, 2010

Flames of War 3rd Haul

The next Batch of FOW 


Flames of War  GE206       Sd Kfz 250/7 (8cm)     Mortar  
Flames of War  GE129      Brummbär (Mid)                                                    
Flames of War  BR886      Lt Colonel Frost and Para Commanders      
Flames of War  BR885      JOE Vandeleur with Forward Air controller


Ok more work, to do


but these are going to be Fun with my Snipers and radio


Roman Bridge in 28mm Project

An idea for some quick Scenary: In this case a Roman type Bridge


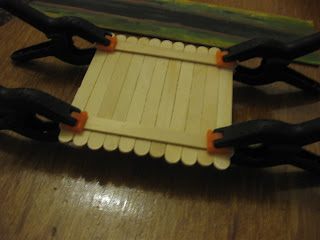
Just gluing Icy pole (ice cream) sticks err Coffe stirers into a square panel


Then when dry to clean up the ends with marking with ruler and pencil the sides of Bridge and the end support beams (struts??) see below on struts.

                                                                         ready to start


my Original template as to the finished section will look like

When the marking is done scribing will make it a little Easier try it on both sides by simply marking around the top and bottom to the reverse side and using ruler and pencil again. as you will have to cut or score both sides or the Balsa will splinter.


Again cut both sides a small model saw is best and again slowly and try to to cut round from bottom to top
So you can reverse and cut again on the rear

Amost there with both sides cut it will eventually just saw through with minimal splintering if any


                                                                    That's that done


my Original template or tester


                                So the three new ones and the Original template,
                           running a Black ink pen down the gaps will bring out some detail

                                   And all three will make a good length roman Bridge

and a bit of Brown to make it look wooded grain


So more on the sides and Finishing it of later (when i get around to It more like) but also will use the Wargames Illustrated article on bridges from about a Year ago

cheers Karcuss

Monday, November 8, 2010

Twilight 2000 Comparisons

   So as promised to some one a comparison of Twilight 2000, Ral Partha, Grenadier and Platoon 20.

 But the 28mm Ral Partha to the four of the six Platoon 20 (The Polish ones)


 Again by them selves the Joys of Digital cameras, I deleted 10 phots as not good enough
But greta to take 20 -30 shots and weed them out like the Pros aghhhhh... (sigh of relief)


 So top row will be Ral Partha and a Sktrex Merc with the South African grenade Launcher
 Then a Ral Partha with the whole Platoon 20 lot (that would be all six) and A Grenadier Minatures with the RPG and then another Skytrex Merc with the Heavy MG. 

And the bottom row are the five Grenadier miniatures with the typical Border Guard Warsaw pact Soviet from Ral Partha for comparison

More later as always
cheers Karcuss

Warsaw pact era Helicopters 1/300 (in work progress)


 Shots of Skytrex Mi 6 which is very basic and was damaged with the tail fins, and no rotor supplied


 again to keep the weight down, as had a B-52 and hercules and two smaller Antonovs can not think of them of the top of my head (as in Catologue numbers), are are only mentioned as they are good and quite bulky.


 H&R Mi8 "Hip"s with rotors and the Sytrex version which comes with a Plastic card with circles (discs) to cut out for rotors....


 And "Hinds"  from H&R and Scotia and Skytrex I am missing at least two I can think of, and my next orders will make the Wargaming sky full of Red stars


 And now I am just being arty......


And just a look, while I continue to paint them...
More later on these, just doing this as a Question on Mil 26

cheers Karcuss